Monday 29 October 2012

Kit review: Alpine's 1/16 USMC

Alpine Miniatures are known for their fantastic 1/16 scale line of single figures. The latest addition is no exception in terms of sharp, well defined detail and natural looking poses.
The parts break down into logical components such as the feet are separate under the brim of the trousers, hands connect at the shirt sleeves and the watch strap which make for perfect connecting points as filling in gaps on flesh can be problematic.
Two heads are provided which showcase the variations of helmets, one covered and one 'steel' which is par for the course for Alpine miniatures in all scales. The facial expression is very well defined which should make for excellent painting. The M1 with bayonet is superbly cast and appears to be the proper thickness required to convey a sufficiently 'hefty' weapon.
If there is one criticism I have it is with the use of straight resin parts for the hanging sling and the two chin straps. This is more of a personal preference issue rather than a problem, I'm used to using lead foil rather than heating and bending resin. All that being said the various buckles and clips on the sling can be clipped off and used in conjunction with lead foil. My reference for this warrior is Osprey Men At Arms #342 "The US Army In World War II (I) The Pacific." Hical, James

Friday 26 October 2012

1/24 RAF seatbelts

There are many options to render seat belts. I predominantly build 1/48 although I am being lured into other scales by the recent flood of outstanding kits. In 1/48, I prefer to paint moulded on belts and often rely on the beautiful seats from Ultracast. In the larger scales, several options are available. Four different approaches are shown in 1/32 using RAF belts as an example.
Right to left are printed and photo etch belts from HGW, Laser cut and photo etch from the same manufacturer, RB Production belts in paper and photo etch and prepainted photo etch from Eduard.
This shows the last two offerings. Eduard shows the stitching prominently and there is limited cutting of parts. RB gives prescored paper belts and separate metal eyes, which were so prominent on the RAF belts. HGW has taken two different approaches. Belt set 132004 is beautifully printed down to the stitching and serial numbers. However, it is not prescored and requires a sharp knife and a steady hand. I am probably not alone in occasionally being a bit ham fisted and I suspect this is the reason behind the laser cut edition. Photo etch parts are unchanged but some of the printed detail of the earlier example is absent. The choice is yours. As I am currently working on the 1/24 scale Mosquito, I have a choice between RB Productions and Eduard belts.
For this build, I will be trying the RB Productions set and use Eduard’s on a second Mosquito. Eduard’s belts are the most widely available. Although I am sure many sources exist, RB Productions can be obtained via their web site, www.radub.com www.Ultracast.com or www.Eagle-Editions.com . I obtain my HGW products from www.Hannants.co.uk although you can visit them at www.HGW.WEBGARDEN.CZ Hical, Allan.

Monday 22 October 2012

Tommy's War Royal Artillery at Mons review

This piece was another acquisition from Euro Militaire 2012. The Tommy's War line is unique because each release is release in chronological order in an attempt to tell the story of the First World War in regiments-a very cool idea!
The figure comes with the usual casting blocks on the elbows, on the base of the neck (head) and a single block on the base of both feet. Cleaning was simple enough except for the mould seam on the ankle wraps which, is common among figures with similar kit but I was loath to slip up and remove any of the sharp detail. The pose of the figure is stellar, especially once fully painted as it portrays a gunner with a proud possibly arrogant stance. The First World War is a seemingly untapped market from figure manufacturers with several exceptions. That being said if it is your area of interest you should check out the 1/32 scale figure line from Tommy's War. Recommended Hical, James

Saturday 20 October 2012

Mossie Progress

There has been slow progress on the Airfix 1/24 Mosquito. The cockpit back decking has been updated but not weathered. Previously removed molded wiring has been replaced with lead wire.
The T.1154 transmitter and R.1155 receiver are finished. Dials are Airscale from their 1/24 Mosquito sheet and the smaller gauges on the receiver are generic 1/32 gauges, again from Airscale Placards appear to be present in variable numbers on the receiver. A single placard from a 1/32 Mike Grant sheet was used.
Colour pictures of both units are presented in SAM Publications “The De Havilland Mosquito” modelers Datafile by Richard Franks. However, one of the nicest pictures of these two units in actual use, all be it in the radio compartment of an RCAF Short Sunderland, is present in a large photo on the back dust cover of the Larry Milberry book, “Aviation in Canada, Bombing and Coastal Operations Overseas 1939-1945.” This is the latest of four recent volumes about the RCAF by Milberry and is a mixture of personal accounts supplemented by a nice selection of photos. Although not shown, identification lights have been added to the lower fuselage using the upgrade set from Paragon. Again, plans from SAM Publications “Mosquito FB VI” by Dave Brown were enlarged 200% and used as a template for placement.

Monday 15 October 2012

Evolution Miniatures Review

While at Euro Militaire this September I spent much of the weekend in the vending area. A very cool miniature I bought was from Evolution Miniatures, a Russian figure company who specialize in 1/48 and 1/35 scale figures.
Upon opening the cardboard box I noted the well defined and sharp details molded in the weapon and main figure. The construction and cleanup was as simple as any of the leading resin companies on the market with the usual single mold line on the inseam of the trousers. I always like to think of new weapons to outfit my modern warriors with but while looking over the CQBR I decided that there was no need to replace it!
It is worth noting that this figure is part of a larger 'crew' of SOF troops from Evolution Miniatures line and they will make up a great vignette or addition to a diorama as they all share this trooper's nonchalant attitude. Hical, James

Friday 12 October 2012

Fischer Skyray first look

The 1/32 scale Douglas Skyray from Fischer Models has arrived. As the Skyray is one of my favorite jets, I have been eagerly awaiting its release. Was the wait justified? Definitely yes. I have been a fan of Fischer Models since building their single seat Sea Fury. In my opinion, Fischer’s subsequent releases have been progressively more impressive.
On first look, the Skyray appears to be Fischer Models best to date; no small accomplishment considering the company it’s in. I will leave the detailed reviews and quick builds to others. However, I have included pictures of the kit contents. The model comprises 118 parts including multiple armament choices. A set of vinyl masks and brass photo etch are included. Decals comprise two sheets covering four machines, including an NATC and a utility bird. This is a beautiful model of a beautiful aircraft. If you have even the slightest interest in the Skyray, consider obtaining this kit. Hical, Allan

Friday 14 September 2012

Mosquito part III

Slow progress is being made on the Airfix 1/24 mosquito. Prominent sink marks are present on the wing trailing edge and the radio ledge at the rear of the cockpit. The moulded on wiring was removed and the sink marks highlighted in green were filled. Lead wire will be used to replace the kit wiring.
RB Productions has released photo etch replacements for the kit radiators and are shown below.
There is noting wrong with the Airfix parts which are moulded with good relief but I wanted to give the photo etch a try. The kit parts and photo etch are shown for comparison.
These are the complete radiators. Vallejo Steel was a good match for the photo etch and was used to paint the supports on the kit parts. Allan Gates

Tuesday 11 September 2012

1/35 UMP .45

The 1/35 Trumpeter H&K UMP .45, is a sleek little package. I only say this because I have no need of the small PDW in 1/35 and yet when I saw the racks of weapons in my local hobby shop I couldn’t resist picking one up! The price point is very reasonable coming in at fewer than eight Canadian dollars. For your money you get four individual weapons with roughly six pieces each including photo etch slings, ANPEQ-2 laser sights, sites for close and medium range engagements, grenade launchers and a very cool fore grip with integral tactical lamp. Pictured here are two variants I have assembled for this review; the first is a rather exotic and brutish variant with a short barreled M203 40mm grenade launcher attached at the six O’clock rail position, an ACOG on the twelve, extended stock and a spare magazine.
I considered the odd format for such an op close and personal firearm and then decided that the shooter (in my case an ODA, CIA Green Badger or DEVGRU operator) would load 40mm buck shot for ‘hard knocking’ on doors, bean bag shots for HVT take downs and possibly Sabot for vehicle disabling or checkpoint duty. The next variant is a more traditional style of PDW; that is it has a folded stock, fore-grip and CQB fast reaction site.
This configuration could be stowed in helicopters or other vehicle crew compartments and could also be carried as a secondary weapon by regular NATO ‘grunts’ in theatre. I have seen various examples of soldiers carrying MP5Ks or short barreled shotguns into combat in urban environments so I don’t think it’s too much of a stretch to show contemporary warriors with a similar PDW. In short I highly recommend picking up at least one of the Trumpeter weapon sets to add to your collection of spare bits and while these injection molded pieces don’t hold a candle to LiveResin firearms they do fill in the more rare niche selection of weapons. Hical, James

Tuesday 4 September 2012

1/24 Scale Airfix Mosquito Part II

The re-enforcing strips on the upper wing of the Airfix 1/24 Mosquito were shown in the last installment. The strips on the lower wing follow several patterns. Early production machines had no strips while mid production machines carried strips with a central enlarged segment, which corresponds to the rocket rail attachment points. The strips are illustrated in the SAM Publications, Mosquito FB. VI by Dave Brown. The scale drawing included are in 1/48 and when enlarged 2X, form nice templates. The photo shows the completed strip in place.
A second pattern of re-enforcement is seen on some Mosquitos, with the wing associated with the rocket rail attachments covered by a large rectangular panel. The next area to be addressed is the wing slipper tanks. The kit’s tanks are too pointed and the upper surface slopes too steeply, giving them a pointed appearance. The kit’s tank is show with the Paragon replacement, which has a better shape.
The final pictures show the appearance of the tanks attached to the wing.
Allan Gates

Monday 27 August 2012

With the base camo set on the ODA, I'll turn my attention to the base. The wooden round base is produced by Andrea Miniatures and is an excellent starting point for any figure or vignette base. The idea behind the simple base was that I wanted the ODA to be standing in a Wadi (dried riverbed) or beside a low wall in an Afghan compound. The references I used for the colour of Afghan mud structures were various pictures in the news and in documentaries. Often times there will be small clumps of grass on the wall which is where Citadel's middenland grass comes in.
The small section of the wall is carved from a square of solid Styrofoam. Once i had hacked enough of it away to give it an aged worn, earthy look I used white glue to set it on the base. There was a visible gap around the joint and also several gaping holes in the wall which i filled with liquid green stuff. The whole base was given a coat of Vallejo Iraqi Sand and then drybrushed with successive layers of the base colour plus a light grey. Pastels were left off until the figures were ready to be weathered to make continuity easier. Hical, James

Thursday 23 August 2012

Fenrisian Raiders Part I

I'd like to start this series by saying that I am not a diehard Tabletop gamer but halfway through my build of GW's Spacewolves Wolfpack kit I decided that I needed to do a series on how to assemble and paint a cohesive and characterful force. I wanted the force to be based around a core of shooters to form up a line and stand and deliver until all of the bits down range stopped twitching. With that in mind, I bought a Wolf Pack to be completely utilized as a Grey Hunters squad. For those not up and current on the Space Wolves roster the Grey Hunters are the battle hardened troop choice and make extensive use of Bolter battle rifles. The basic kit comes with enough parts to make far more than ten miniatures if you happen to have extra legs, torsos and backpacks from other space marine kits in your bits box!
Shown above are the basic parts involved in creating a single Grey Hunter. Note that I have added extra purity seals and a boltpistol. For this ten man unit I will be adding plenty of spare kit and ammunition to the figures as a unifying factor. Other unifying factors for could be using only helmeted or bare heads, painting pauldrons the same distinctive colour to make that unit stand out or using numerical or iconic transfers. Please stay tunned for more modelling articles to come! Hical, James

Tuesday 21 August 2012

ODA Build Part II

When we left off a few weeks ago, the ODA had a single member and the weapons were primed. Two additional Operators have been procured from Legend Productions and are shown here as sub assemblies in a first draft of the vignette.
My source for in-field Multicam can be seen below. Note that I cannot take credit for this image as it had been posted on Facebook.
The points to notice when looking at this fantastic combat photo is the grime on the fatigues; the Multicam is hidden under a layer of Afghan dust. This is a detail that, with the aid of some pigments can really bring the vignette to life. When undercoating the miniatures I considered the composition of Multicam: the base colour-which I took to be a burnt umber/NATO brown. The medium islands, wich were a light olive green, a pale tan and a medium green (a touch above US gunship green). These islands are not traditionally formed or shall we say "volcanic." By this I mean that they seem to be bled together forming a jiggsaw puzzle like pattern. The upper layer is made up of "snakes" or "worms" of black and white. I suggest applying the camo in the order I introduced the colours as this will allow you to form the pattern with greater accuracy and ease. More to come on this build and others! Hical, James

Sunday 19 August 2012

Allan's progress on a 1/24 scale Airfix Mosquito

The following are a few pictures of work in progress on the Airfix 1/24 scale Mosquito VI. I like the kit a lot although storage will be a bit of an issue. However, there are a few areas that needs a bit of upgrading. The wings lack the reinforcing tape, which was applied over the wing spars and under the forward mounts for the rocket rails. There are three approaches I have seen. The first is to use parallel strips of tape as templates, put putty between, and sand back to the tape. The remaining two use plastic strip. Strip 0.005 thick would scale out to 1/8 inch thick and is probably the correct thickness. I saw this used in one build. However, I found that gluing even 0.01 strips resulted in some surface unevenness. I opted to use Evergreen 0.01 thick # 108 strip because was the proper width. This was first attached with Krazy glue and a small amount of Tenax 7 was run along the edge. I applied thick Humbrol oil paint to fill any gaps as well as to guide sanding.
All the plates than had the edges beveled and were sanded down to approximately 0.005 inches in thickness. This picture also shows a template of the rear plate made with 6 mm Tamiya tape. The next pictures show the template applied to the Evergreen strip and the plate in place.
The final picture shows the references used, Mosquito VI by SAM Publications being particularly helpful and still available. (insert picture 0476 here)

Friday 10 August 2012

The 50th anniversary Abbotsford air show is happening from August 10 to 13, 2012. To get in the spirit, I am posting a photograph of 5 Operational Training Unit Mitchell III, serial KL144, taken at RCAF Abbotsford in the summer of 1945. This aircraft would survive until involved in a take off accident in Edmonton on March 3, 1956. The second photo is of the Canadian Warbird Heritage B25J pictured in Abbotsford after arriving for the 2012 air show. It is parked on the runway just in front of where KL144 was pictured 67 years ago. Hical, Allan

Saturday 4 August 2012

5 OTU final entry

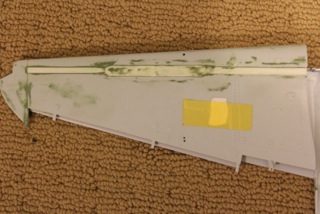
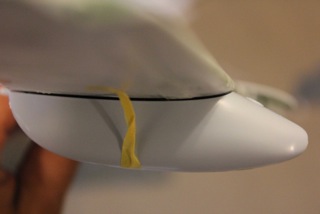
This final installment will deal with three changes to Liberators markings. These were the application of yellow identification markings beginning in the fall of 1944, removal of camouflage on at least the Abbotsford Liberators beginning in February 1945 and the replacement of aircraft codes from around May 1945. These will be discussed in the reverse order in which they occurred. The change of codes was discussed in Part 2. As previously noted, around February 1945, Liberators at Abbotsford began to be stripped of camouflage paint. A picture from March 3, 1945 shows a mixture of both painted and unpainted B 24’s. This loss of camouflage predated the previously discussed change in aircraft codes. Variation between aircraft occurred, with KG880, code “Y”, maintaining painted turret and canopy framing as well as having a triangular olive drab antiglare panel while KH106, code “AP” showed only painted canopy frames. A later picture of this aircraft when coded “VG” shows it with a painted replacement left inner cowling. In addition, partially marked aircraft could be seen; such as Liberator code “AK” flying without serials or upper wing roundels while in formation with another aircraft devoid of any codes. The last change to be discussed was the application of yellow identification panels, with the earliest examples pictured in late 1944. These took the form of 45-inch bands on the rear fuselage, which partially overlapped the aft bomb bay doors, yellow rudders or yellow wing panels from the upper wing roundel to the wing tip. The wing panels might extend straight back to cover part of the aileron. Alternately, some aircraft had the entire aileron painted while others sported overall aluminum ailerons. In the article on 5 OTU by J.E.H. Fail, he stated that Boundary Bay Liberators were to remain camouflaged and to have yellow fuselage bands and rudders while Abbotsford’s aircraft were to be unpainted and to carry yellow wingtips. However, EW216, code “P” was a Boundary Bay Liberator, which had paint removed. Also, photos show yellow bands on Abbotsford aircraft as well as yellow outer wings on some but not all natural metal planes. While yellow rudders were to be used in conjunction with the fuselage band, photos show their use to be sporadic and to have also been used on aircraft with yellow wing tips. All these changes are well represented on Liberator KG931, code ”AK”. This aircraft was photographed at Abbotsford in camouflage with yellow wing tips. Of note, is that it also shows a natural metal band aft of the wing in keeping with the removal of the fuselage band. The aircraft did not carry upper wing roundels. An in flight shot shows “AK” in natural metal, codes moved to the nose, no serial numbers and dark rudders. These were probably olive drab but a side profile of “AK” shows the rudders to now be yellow. As noted, yellow rudders were not universal, with KH174, now coded “VP” showing rudders painted aluminum. I have a soft spot for the Liberator and have accumulated a few references over the years. However, I would like to mention two I find most useful. The first is the recent MMP Books publication “Consolidated Mess” , ISBN 978-83-61421-16-0, by Alan Griffith. This is an illustrated guide to nose turreted Liberators and a comprehensive reference for anyone interested in the subject. The second reference is “Canada’s Wings 2, The Liberator and Fortress”, ISBN 0-920002-01-3, by Carl Vincent. This is an indispensible reference for anyone interested in the history of these aircraft in Canada and the source of much of the information in these articles. The book also stands on its own as a general Liberator reference, the photos of the Leigh Light installation on the ASW B24s being particularly helpful. Although long out of print, it occasionally will show up on Amazon at a reasonable price. Grab it if you can. Hical, Allan

Saturday 28 July 2012

Bristol Beaufighter part II

The Beaufighter has been built to represent ND221 as it would have appeared during the last months of Beaufighter use with 406 Squadron. The aircraft represents a Mk VIF from the second last Mk VIF production batch. It represents a mid production Beaufighter fitted with a thimble nose although the ADH decal sheet was not clear as to whether this was fitted. Much was written about the Tamiya Beaufighter at the time of its release. Although a nice build, engine and interior detail were more simplified than one might have expected. The cockpit and the radio compartment behind would benefit from upgrading. The interior used on this build was from KMC with scratch building in the radio compartment. The rear fuselage used Eduard photo etch sidewalls as well as scratch built details. However, unlike the cockpit, this work is difficult to see. Aires does an upgrade for the fuselage from cockpit to rear entrance, which looks very impressive, and I will use this on my next Beaufighter. The engines used are from Cutting Edge. Although very nice, the increased detail largely goes unseen. Exhausts are from Hi-Tech. The resin is brittle but they are an improvement on the kit’s exhausts. Ultracast does very nice replacements and the Flight Path upgrade gives white metal examples with photo-etch for the individual vents for those with more skill and patience than I possess. However, the Flight Path upgrade is a very comprehensive package and includes a large amount of photo etch, a resin extended fin, winch for the target tow version as well as a very nice torpedo. Cowl flaps on this kit are also resin replacements. As far as I am aware, the only cowl flaps currently available are from Red Roo but I have not used them. The upper wing gun access panels were modified to represent those of the Mk VIF rather than those of a TFX represented in the kit. The reference was an article in SAMI by David Batt from some years ago. The decals were from an ADH sheet but were very translucent and best avoided. I would recommend Xtradecal codes and serials. On the other hand, the ADH Publications “How To Build Tamiya’s Bristol Beaufighter “ is a very useful reference. SAM Modellers Datafile 6,”The Bristol Beaufighter” is also very good. The Hyperscale reference section also gives very useful interior and exterior photos of a preserved Australian Beaufighter. Hical, Allan
.

Wednesday 25 July 2012

Luftwaffe Pilot 1/32

This Ultracast 1/32 scale Early War Luftwaffe pilot pulls his flight gloves tight as one of the Airfield cats peeks out from between his boots. Pilots, I will admit are not my strong suite, mainly because they are not typically dirty compared to front line troopers or tank crews. That being said when Allan gave me two newly released Ultracast pilots and a Fisher Seafury pilot I found myself seeing the appeal to the general character of the subject. That is to say that the pilots (especially the most recent releases from Ultracast of the RAF and Luftwaffe pilots) project a sense of arrogance or pride. This is reinforced by their pristine, fresh uniforms and equally arrogant looking fighters.
For example a Me109 D or E variant which have a high nosed perch, almost aristocratic appearance about them.
The cat was taken from a 1/35 scale Tamiya figure kit and was added because of various reference photos Allan has that show Luftwaffe pilots posing in their cockpits with either kittens or small dogs. I thought it was a charming and humanizing detail that would give the figure a bit more individuality.
HighCal, James